So, you’ve got a story. A good one. Maybe even a great one. You’ve got compelling characters, a plot that makes your friends lean in when you talk about it, and a world that feels vivid in your head. You’re ready to write your screenplay. Amazing!
But then you open a blank document and… suddenly you’re not sure where to start.
Do you just write your screenplay like a story? Like a play? Like dialogue with paragraphs in between?
You Google ‘how to format a screenplay’ and are instantly bombarded with Courier fonts, margin measurements and all manner of elements… and wait, what do you mean I can’t describe internal thoughts and feelings?
Formatting can feel like a barrier to you writing Hollywood’s next big movie script. But here’s the truth: screenwriting isn’t just a set of picky rules. It’s a language that directors, actors, designers, cinematographers, and editors use to communicate. Once you understand that language, your screenplay becomes what it’s meant to be: a blueprint for a movie.
And in today’s blog, we’ll be breaking down that language step-by-step, ensuring you feel confident to write a script that looks professional, reads visually, and above all, feels cinematic.
Ready? Then let’s go!

The Visual Language of Format
Many new screenwriters think formatting is about ‘doing it right so Hollywood doesn’t make fun of you’. And yes… turning in a script with the wrong font is a very quick way to signal that you’re a beginner.
A screenplay isn’t a finished work of literature, but instructions for collaboration. Its purpose is to give a film crew everything they need. For example:
- A director who needs to visualize shots
- A producer who needs to estimate the budget and schedule
- Actors who need to understand rhythm and emotional flow
- A cinematographer who is already thinking in frames and movement
- An editor who is imagining pacing long before footage is shot
The screenplay format exists to make your movie visible in the mind of the reader. And the clearer the image, the more cinematic your script will feel.
Screenplay Elements
Screenwriting teaches us to think in pictures. Unlike prose fiction, where you can explore inner thoughts, memories, or backstory, screenwriting demands that everything appear on the screen, just as described by the WGA’s spec script formatting guide. If the audience can’t see or hear it, it doesn’t go in the script. Simple as that.
Okay so we’ve talked about what you can’t include in your script, and now it’s time to talk about what you can. We’re all about positivity here!
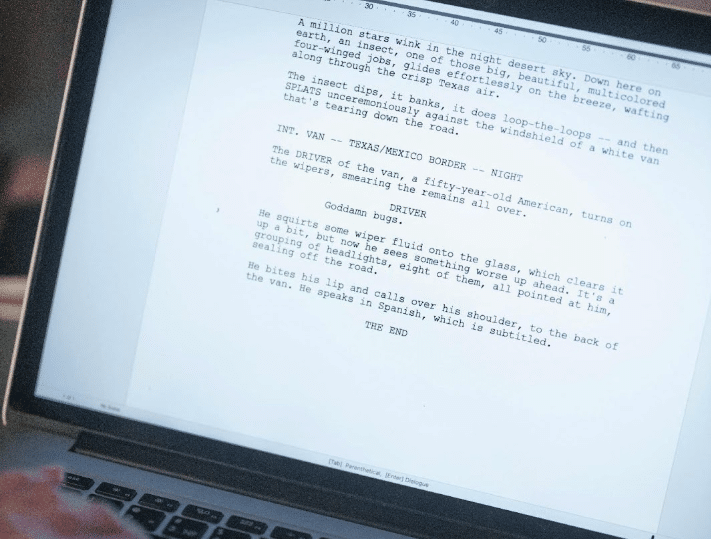
Action Lines
Action lines describe what the viewer sees and hears in the moment.
A bad action line looks like this:
Sarah remembered the way her father used to scold her when she failed, feeling the old pain rise up.
We can’t film this; it’s internal. Let’s fix it:
Sarah stiffens. Her jaw clenches. The glass trembles in her hand.
Here we can see emotional impact through behavior.
Now, it wouldn’t be a Celtx blog without our top writing tips. And here are some for writing visually focused and well-paced action lines:
- Use present tense (the movie is happening now!)
- Write active verbs (characters do things and things happen)
- Keep sentences short
- Keep paragraphs 1-3 lines maximum (readers skim, so help them!)
Tony Gilroy and William Blake Herron’s script for The Bourne Identity is a great example of standout visual writing, with scenes clearly mapped out with short sentences and strong pacing.
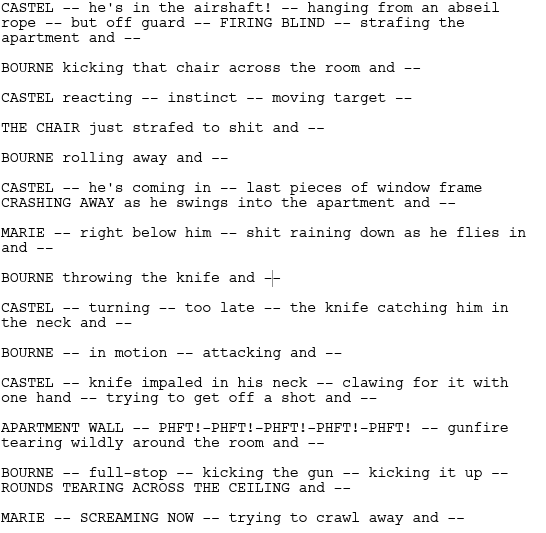
Notice how the line breaks create pacing as the scene moves between each character? The page is the rhythm.
For more on writing killer action lines, click here.
Scene Headings
Scene headings (also sometimes known as sluglines) tell us whether we’re inside or outside (INT. or EXT.) a scene’s location, and what time it is (day or night is enough).
For example:
INT. DOCTOR’S WAITING ROOM – DAY
You can also use secondary scene headings if the scene doesn’t change location but shifts focus. Just like:
AT THE COUNTER
Or:
LATER
These can be especially useful for pacing without breaking flow.
You don’t need fancy time-of-day variations either, but they can be used if absolutely necessary. Save your creativity for action lines and dialogue.
Speaking of which…
Dialogue
Dialogue formatting is simple. First the character name is centered-ish and capitalized.
If you are using a parenthetical, this goes directly underneath the character name. Parentheticals are quick clarifications for how the line is spoken. These should be used sparingly. If every line needs explanation, the dialogue isn’t clear!
A good example of parenthetical use would be:

Whereas we don’t recommend this:

Yeah, don’t do that!
So, how can you make sure you pace dialogue well. Here are some more of those top tips:
- Short lines read faster, making tension sharper
- Long line slow scenes down
- One-word lines can hit like punches
But most of all, we encourage you to play with rhythm. Not all characters speak in the same way, so make sure this shows in your script! And for more dialogue tips, click here.
Transitions
Transitions help guide the reader between scenes, but they’re used sparingly in modern screenwriting. Most scene changes don’t need any explicit transition at all, and readers assume the film simply cuts to the next moment.
Only use transitions when it adds meaning, such as:
- A sudden emotional shift
- A clear passage of time
- A visual or thematic contrast
- A specific stylistic emphasis
Common transitions include:
- CUT TO: Standard, optional, usually unnecessary
- SMASH CUT TO: Abrupt contrast or shock
- DISSOLVE TO: Time passing or memory/soft emotional tone
- MATCH CUT TO: Visual link between two images
- FADE IN / OUT: Opening and closing the script
Used well, transitions guide tone and rhythm. Used too often, they draw attention to themselves, so we advise applying them intentionally and minimally.

The Technical Essentials
If you take nothing else from this blog, remember screenplays are formatted in:
- Courier 12-point font
- 1-inch margins (roughly)
- About 55-60 lines per page
By setting out these conventions, it means every one page of script roughly equates to one minute of screen time. This instantly makes your script usable for production planning.
Software like Celtx, Final Draft, Highland, or WriterDuet handles this automatically.
Turning Your Story into a Blueprint
At this point, you understand why screenplay format works the way it does. But the real challenge isn’t memorizing formatting rules but learning to translate your story into scenes that feel cinematic.
Many new writers sit down with their idea and try to “write the screenplay” from page one… and quickly stall.
Here’s how to move from idea to outline to scenes and finally to formatted script in a clear, manageable way.
Step One | Start with the Core of Your Story
Before you break anything into scenes, answer two things clearly:
- Who wants something? (Your main character’s goal)
- What stands in their way? (The conflict/obstacle)
If your story doesn’t have a character with a need and something (or someone) blocking them, it’s not yet ready for script form. Don’t overthink plot yet and just focus on the emotional engine.
For example:
- Character: Maya, a young chef.
- Goal: Open her own restaurant.
- Obstacle: Her family wants her to take over their failing diner.
That’s a story core. Everything else builds from here.
Step Two | Create an Outline (like a Beat Sheet)
A beat sheet is a list of major story beats. A very simple structure might look like:
- Introduction: Who the character is and what their normal life looks like.
- Inciting Incident: The event that disrupts their world.
- Rising Conflict: Things get harder, stakes rise.
- Climax: The hardest moment, where everything comes to a head.
- Resolution: What changes?
Don’t worry about details here. Just write down the major turning points.

Step Three | Break Your Beats into Scenes
Every scene should be a moment of change. Ask this question for each scene you outline:
What changes from the beginning to the end of this scene?
Examples of valid scene-level changes:
- A character learns something new
- A relationship shifts (better or worse)
- A decision is made
- A new obstacle enters the story
If there’s no change, the scene is either filler or setup, and filler needs to go.
Step Four | Determine the Time and Location for Each Scene
This gives you your Scene Heading. Ask yourself where each scene happens, physically, in the real world. For example:
- INT. FAMILY DINER – NIGHT
- EXT. CITY PARK – MORNING
- INT. HOSPITAL WAITING ROOM – DAY
If your scene can’t be placed in a real, filmable setting, it’s not visual enough yet.
Step Five | Convert Description into Action (Show, Don’t Tell)
Now rewrite your beat/prose in visual terms. So, instead of:
Maya remembers the pressure of her parents’ expectations.
Write:
Maya wipes the same spot on the counter again and again. Her father watches her… silent, waiting.
Remember, the whole point of action lines is to show behavior to convey emotion, not to describe feelings. This is one of the hardest skills in screenwriting and the most important!
Step Six | Layer in Dialogue
Dialogue is where personality and conflict surface. To write it effectively, we suggest you:
- Know what each character wants in the scene
- Let the conflict shape the rhythm
- Keep lines concise (shorter plays better)
If the dialogue starts explaining plot or feelings too directly, ask yourself if an emotion can be shown physically instead. Often the answer is yes.

Step Seven | Read Your Scenes Out Loud
This is your built-in editor and rhythm check. If reading your script feels:
- Clunky, then simplify the action lines.
- Flat, then raise stakes or conflict.
- Slow, then break action into shorter lines.
While you are writing something that’ll be initially read, remember that you’re also writing something to be performed.
CELTX TOP TIP: You don’t have to get this right on the first pass. While the first draft is about translating the story into visual beats, the second is where you refine clarity, pacing, and tone.
Download Your Free Template!
Now most things in life aren’t free. But our screenwriting template definitely is!
Download our simple, clean, professionally formatted screenplay PDF you can upload directly into Celtx (or any screenwriting software) and begin typing. It already includes:
- Courier 12 pt. font
- Correct margins and spacing
- Sample scene headings, action, and dialogue blocks
No setup and no formatting headaches. Just open, replace the placeholder text and start writing. It’s as easy as that!
FAQs
– Overwriting action lines (walls of text).
– Describing internal thoughts instead of behavior.
– Using non-standard fonts.
– Including camera directions (unless you are the director).
Not completely. It handles margins and spacing, but it can’t fix storytelling. If your script reads like a novel, software won’t translate it into visual beats. That’s your job.
Because it maintains a consistent character width. That allows scripts to be accurately timed for runtime planning.
Roughly one script page equals one minute of screen time. So, a 110-page script is about a two-hour movie.
Conclusion
Formatting isn’t here to constrain your creativity, it’s here to translate it. When you learn the visual language of screenwriting, your script becomes easier to read, to imagine, and to produce. It becomes a working document and a movie waiting to happen.
So, treat format not like homework, but like craftsmanship. Because the goal isn’t just to write a screenplay. The goal is to make it filmable.
Focus on your story, not your formatting.
Let Celtx’s Script Editor automatically apply all industry rules while you focus on the story.
Up Next:
How to Format a Short Film (with Free Template)
Ready to test your storytelling skills on a smaller scale? Learn how screenplay format adapts to short films and see what changes (and what stays the same).