Short form video is taking over. From YouTube to TikTok, social media platforms are a great place to create and advertise your brand.
There’s one step in the video production process of short form content that can make the difference between an idea and a successful, polished product: storyboarding.
Storyboards are essential! But we know for a fact that many content creators skip them altogether. Really, storyboarding isn’t just for big-budget productions or animation studios and can hugely benefit any sized project.
But how do you create a storyboard for short form content? Well, in today’s blog, we’re pulling back the curtain and shining the light on why storyboarding is so important, what you need to include in one and how you can create a storyboard.
Just think, you could save so much time, energy and resources! Sound good? Well, let’s get on with it.
Table of Contents
- Why Storyboarding Matters in Video Production
- Who Needs Storyboards?
- What to Include in a Video Storyboard?
- Storyboard Examples for Video
- Tools to Help You Storyboard a Video
- How to Make a Storyboard in Celtx
- Conclusion
Why Storyboarding Matters in Video Production
It’s all well and good to have a strong vision in mind but translating that clearly to collaborators can be a whole different ball game.
In essence, the storyboard bridges the gap between your imagination and the overall execution. From camera operators and editors to clients, a storyboard helps everyone get on the same page.
Here are just three key advantages to storyboarding your short video:
1. Clarifies Your Vision
Adapting your vision into a storyboard forces you to think about how each scene will look and feel. It allows you to make early decisions on framing, camera angles, pacing, and transitions.
This process helps you find holes in your story or visuals before you’re on set or in post-production.
2. Saves You Time and Money
While pre-production planning may seem tedious, it will hugely reduce mistakes and inefficiencies during filming.
If you can visualize your shots ahead of time and create a storyboard, you minimize reshoots, on-set confusion, and extensive editing timelines. Don’t improvise and leave things to chance as you could find yourself spending more time and money than is necessary.
3. Enhanced Collaboration
If everyone involved in the production refers to the same storyboard, it means you’re all literally on the same page! Everyone’s expectations are aligned with no room for confusion.
Who Needs Storyboards?
So, who are the creators that could need storyboards? Well, you may be surprised at how many types of creators can benefit from storyboarding (and not just professional directors or animators). Storyboards are ideal for:
- Marketers
- YouTubers
- Teachers
- Indie Filmmakers
Marketers
With the rise in social media marketing especially, storyboarding is one of the most powerful video production tools available to marketers. With constant tight deadlines and budgets, there is little room for error when it comes to brand campaigns.
A storyboard lets marketing teams pre-visualize campaigns, maintain brand consistency, and ensure messages are both clear and compelling.

YouTubers
From daily vloggers to educational creators, storyboards can be lifesavers for YouTubers. They are used to plan shots, build narrative flow, and improve video pacing.
Even basic stick-figure sketches can help visualize B-roll inserts, title cards or reaction shots.
Teachers
Educational videos are becoming increasingly popular for online learning, especially after the COVID pandemic.
Teachers continue to create tutorials or classroom content so storyboards can help break lessons into digestible visual steps, making sure each section supports learning outcomes.
Indie Filmmakers
For low-budget films, preparation is even more important. Indie filmmakers often need to wear multiple hats and rely on small crews to support the production.
That’s where a detailed storyboard comes in. It can ensure the limited resources are used efficiently while still delivering the desired cinematic results.Check out how storyboarding was essential to the filming of Alien: Romulus here.
What to Include in a Video Storyboard
While many storyboards are artistic masterpieces in themselves, they don’t all need to be works of art. Clarity is the most important thing along with your entire team being able to follow it.
But what should you include in your storyboard? Let’s explore what each frame (or panel) in a storyboard should have:
1. Visual Sketch or Image
This can be as simple as a pencil drawing, screenshot, or photo. Each image represents a key moment or camera shot.
If you’re not a strong illustrator, tools like Celtx or storyboard templates make this easier. But more on that later!
2. Scene Description
To accompany your visual sketch or image, add a few lines explaining what’s happening. Consider what action is taking place, if characters are speaking and any special effects.
Scene descriptions are great to provide any context that the image alone may not convey.
3. Camera Directions
Include notes on the shot type (wide, close-up, POV), movement (zoom, pan, tilt) or angles (over-the-shoulder, high-angle). These instructions help your cinematographer and camera operators understand how to capture the movement in each panel.
Want to learn more about camera shots and angles? We have a blog for that! Click here for our dedicated post.
4. Audio Notes
Include any details on dialogue, sound effects, or music cues if applicable. These can be especially useful in marketing or animation as syncing visuals to sound is critical. A well-labeled storyboard keeps everything together.
5. Timing
You can also note how long each scene or shot is expected to last, but this is completely optional depending on your project. It can help with pacing and ensures the overall video hits time targets, especially in TikTok videos or commercials.
Storyboard Examples for Video
Now you didn’t think we’d leave out our usual examples did you? Good, because they’re on their way right now!
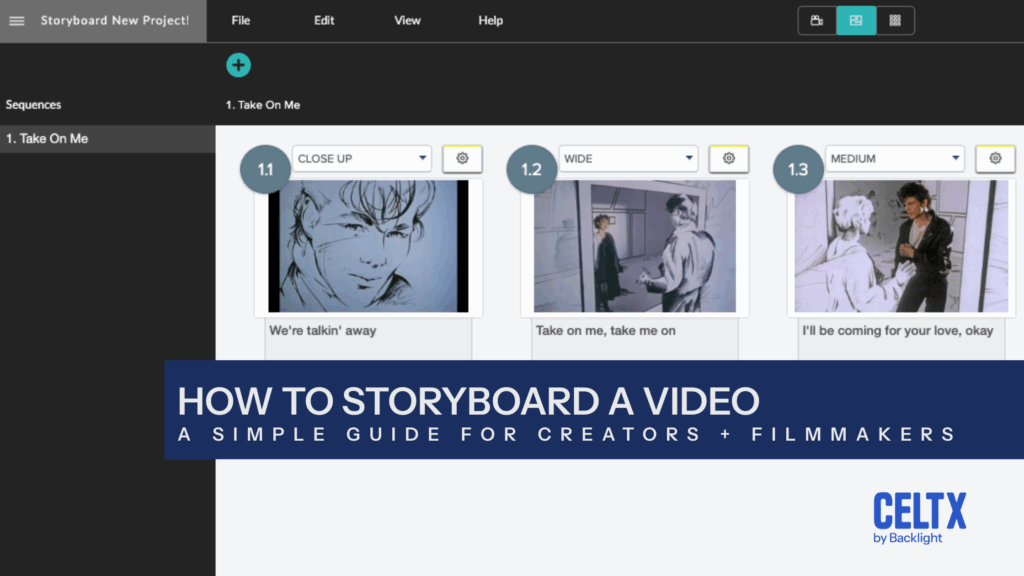
Case Study #1 | Take On Me (Music Video – A-ha)
A legendary case of storyboarding, the music video for the 1980s classic song Take On Me is a hybrid of live-action and rotoscope animation.
The video was meticulously storyboarded to create a blend of fantasy and reality. Read more about this process right here.
Essentially, each frame was carefully planned to ensure fluid transitions between animated sketches and live action. Without a clear and comprehensive storyboard, it would have been impossible to recreate the video’s unique look.
Case Study #2 | Whiplash (2014)
Though made on a limited budget, Damien Chazelle’s indie movie Whiplash features lightly choreographed drumming sequences that were painstakingly storyboarded to sync with both music and character emotions. According to the Hollywood Reporter:
Chazelle had meticulously outlined every scene, hand-drawing 150 storyboards, to keep the production moving like clockwork, shooting as many as 100 setups a day. – The Hollywood Reporter (Rebecca Ford, 2014)
This outlining was particularly important in the final scene with each drum hit, camera pan and reaction shot needing to be pre-visualized to match the temp and tension of the music.
Case Study #3 | Marques Brownlee
Marques Brownlee is one of YouTube’s key influencers, with 19.9 million subscribers on his main channel! He hasn’t had such success by accident, with his tech videos inspiring many filmmakers and aspiring content creators.
In an interview with Lifehacker, he explained the importance of storyboarding in his creative process:
Here’s a tip for video shooters: Storyboarding. In college, I didn’t have time to storyboard videos. I’d write down a set of bullet points over the course of a few days, then when it felt complete, I’d fire up the camera and attempt to capture everything. Now that I don’t have classes all day, I can be much more deliberate with how I make video, and storyboarding/planning almost every shot beforehand helps me focus less on the mechanics and more on the content. – Marques Brownlee (Lifehacker, 2015, Andy Orin)
Tools to Help You Storyboard a Video
Technology can be a wondrous thing, and this is no different for storyboarding. Gone are the days where pencil and paper are completely relied upon (though you can absolutely still use these) and there are several tools you can use to make storyboarding both faster and easier for all skill levels. Here are some of them:
1. Celtx
Yes, it’s us again! Our all-in-one pre-production suite includes storytelling tools designed for video creators like you.
So, what do we offer?
- Creation of visual boards with drag-and-drop images.
- Adding camera and audio notes.
- Syncing your boards with scripts and shot lists.
- Collaboration with your team in real-time.
Our software is ideal for creators like you who want a structured and professional tool without needing to learn graphic design. The best part? You can sign up for a free account with your first project included!
2. Canva
For quick and simple storyboards, Canva offers customizable storyboard templates. We highly recommend this for YouTubers and teachers who don’t need production-level detail.
3. Boords
A storyboard-specific software, Boords has an intuitive layout and many export options for client sharing. If you’re looking to create detailed storyboards, this is the choice for you.
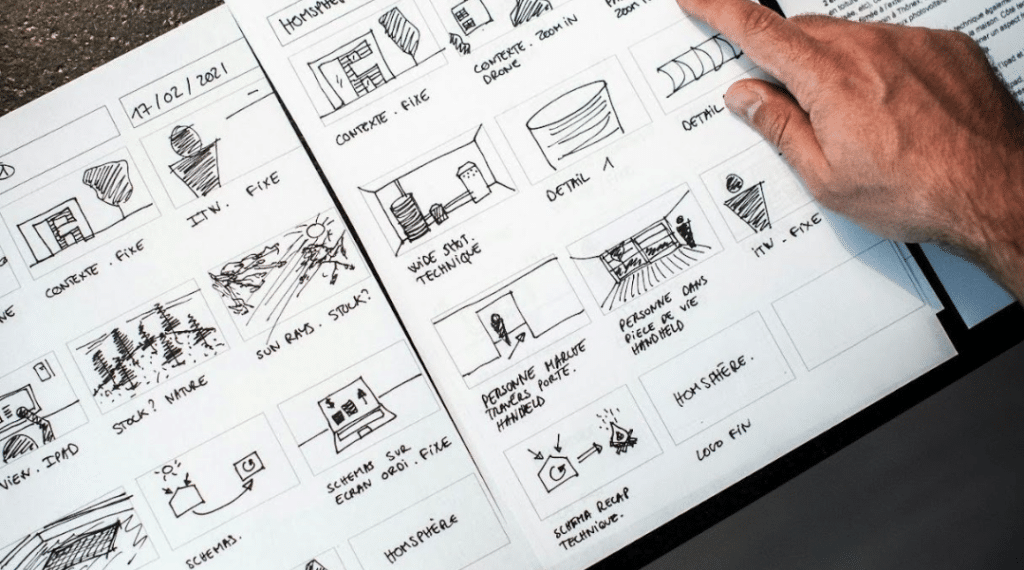
4. Pen and Paper
Of course, never underestimate the power of analog. Sketching on pen and paper, especially in the early stages, is fast, flexible, and completely free. Combine with a phone camera to digitize and share your storyboard easily.

Want more? Check out our Top Ten Best Storyboarding Software in 2025.
How to Make a Storyboard in Celtx
Let’s take a look at how you can make a storyboard for your script in Celtx!
Step 1 | Write or Import Your Script
From your dashboard, click on Create.
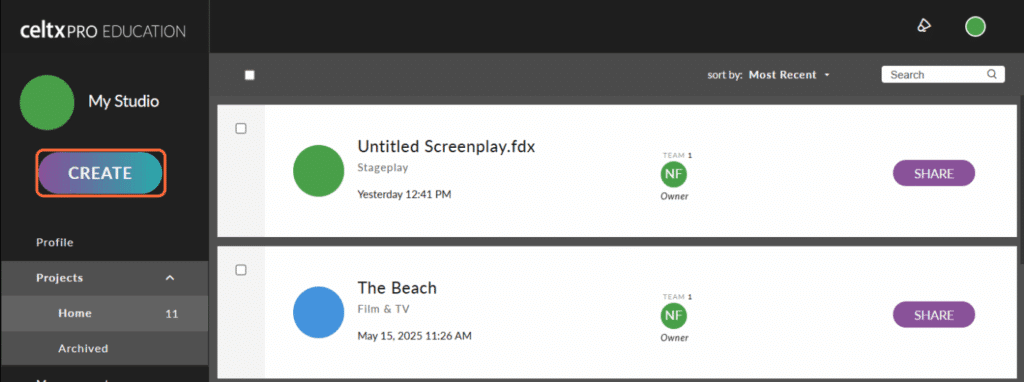
Next, click Film & TV
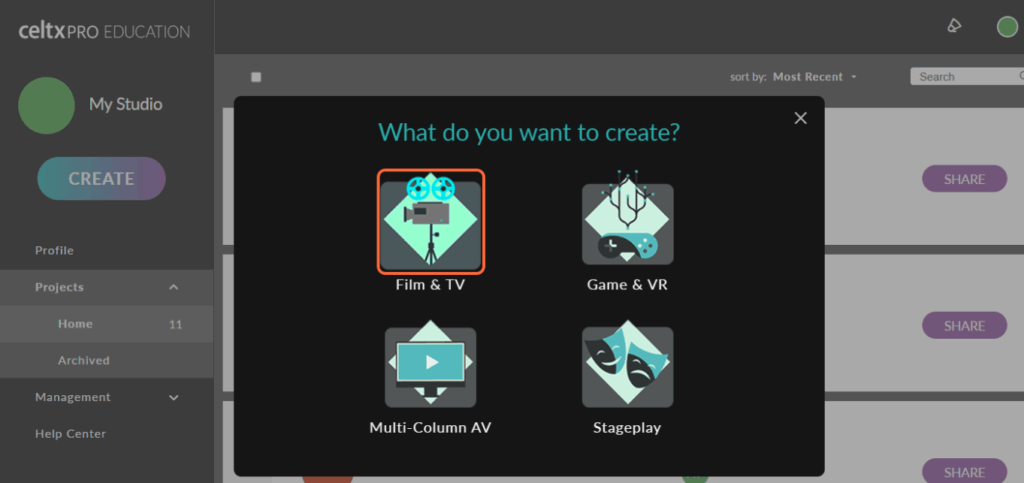
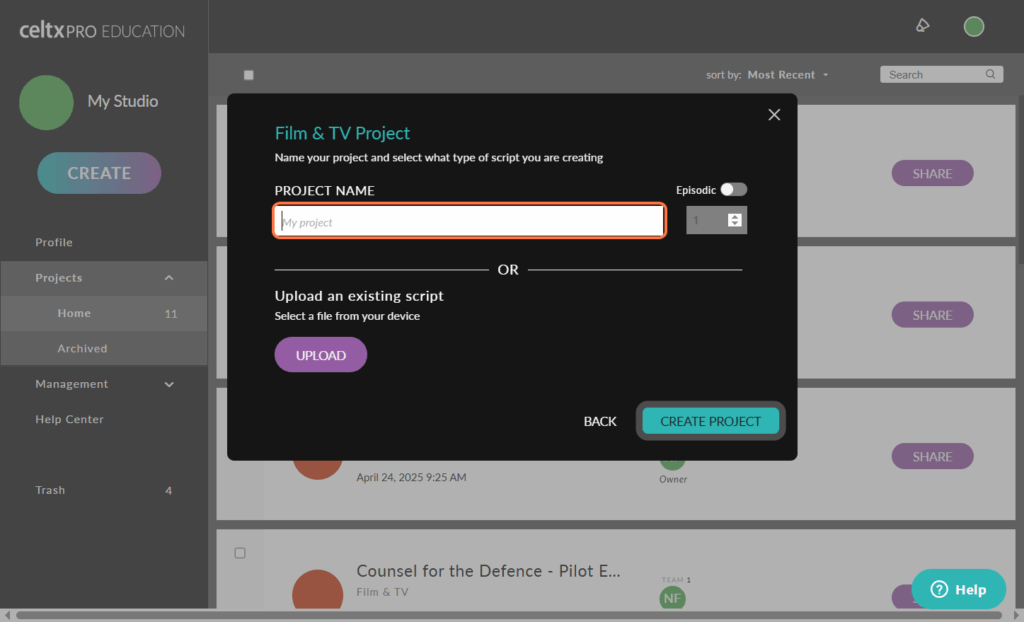
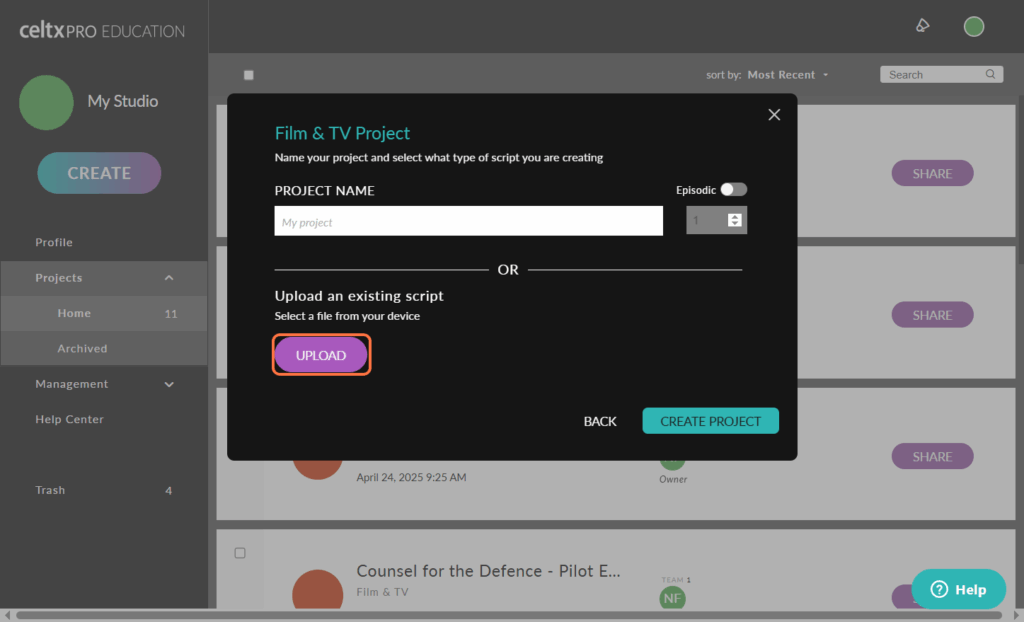
You’ll then have the option to upload an existing script or start a new project.
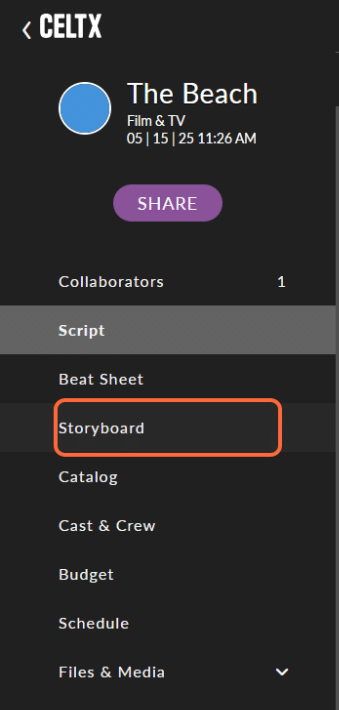
Step 2 | Create Your Storyboard
On your script dashboard, click Storyboard on the left-hand side.
From here, you can upload your images. These can be sketches, photos or placeholder images. Each frame corresponds to a shot or camera angle in your video.
BONUS TIP: Celtx also has its own scene builder with stock images. Check out our full walkthrough below for details.
Step 3 | Add Scene Information
For each frame, add descriptions, camera notes, and audio cues. This is where you plan each visual beat and what the audience sees and hears.
Once you’ve done this you can group your frames together to create sequences:
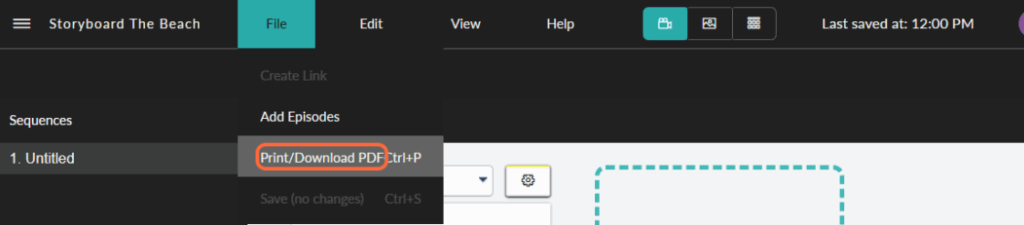
Step 4 | Export your Storyboard
When you’re ready to export your storyboard, you can either print as a PDF or share directly to your collaborators through Celtx. It couldn’t be easier!
First, click File.
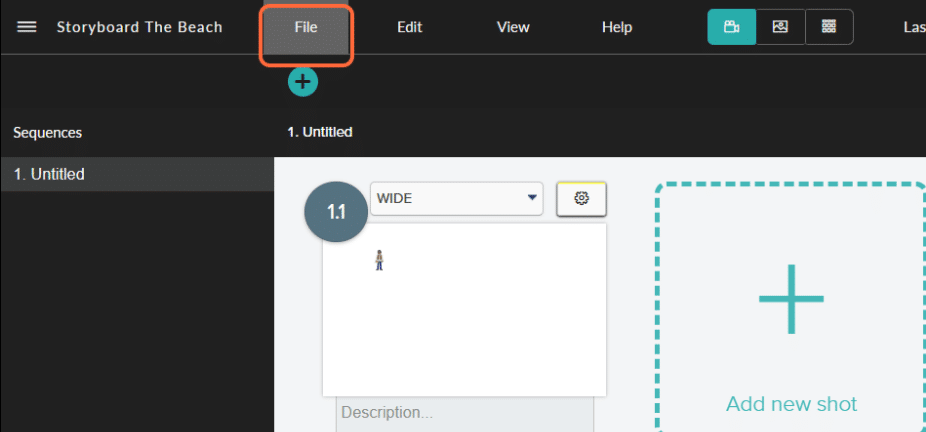
Then select Print/Download PDF to export in the manner of your choosing.
For our full walkthrough of how to storyboard with Celtx, click here.
Conclusion
Storyboarding might feel like an extra step in the fast-paced world of content creation, but it’s actually a shortcut. It saves time, aligns teams, and enhances creativity by forcing you to think visually before hitting “record.”
Whether you’re a marketer crafting a product launch, a YouTuber scripting your next viral hit, a teacher preparing a lesson, or an indie filmmaker chasing your first award, a storyboard is your secret weapon.
By using tools like Celtx and taking inspiration from the greats (like A-ha’s unforgettable video), you can storyboard your ideas into reality frame by frame.
Ready to start storyboarding with Celtx?
Click here to sign up!
Up Next:
AI Storyboarding Tools: What Creatives Need to Know in 2025
AI tools are evolving fast—but storyboarding still matters. Discover why human creativity, vision, and planning are irreplaceable.